


Amy and I went shopping at one of my favorite stores the other day.
And I came across a really hideously painted 'entry table',
'television table', 'table thingy'.
'television table', 'table thingy'.
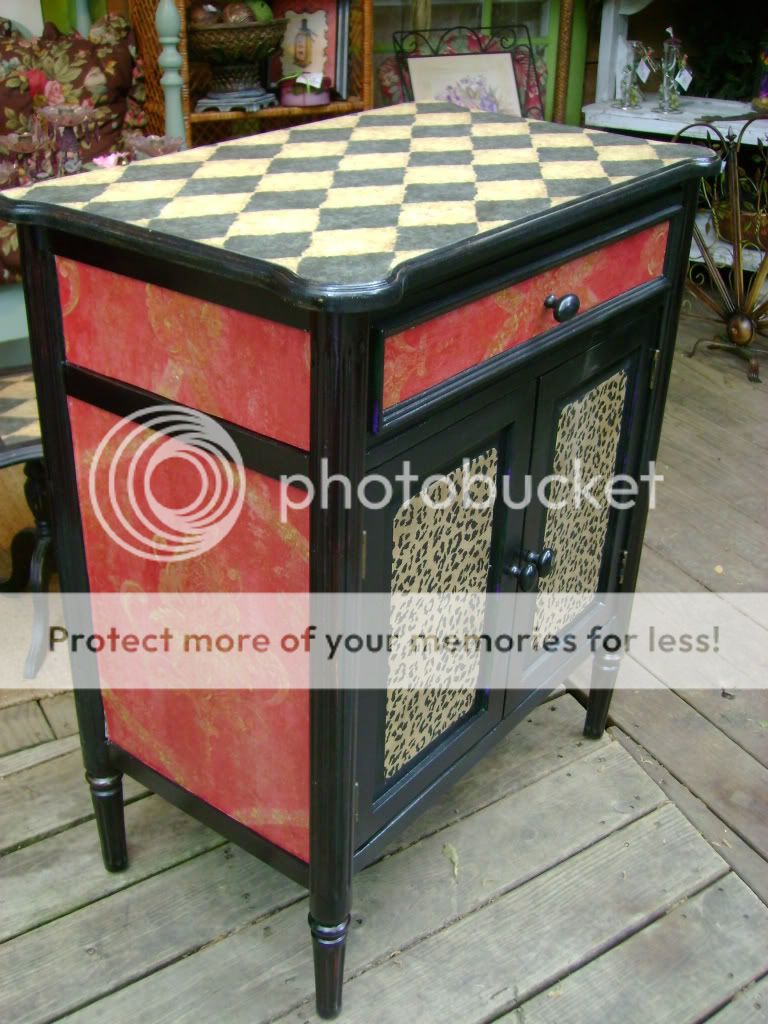
The price was great but the paint was...well, you decide for yourself


So, I started painting, and wallpapering, and enlisting the help of random folks just passing by.

No, seriously, that's just my friend Nancy who stopped by to say 'hi' and I promptly put her to work.
"Thanks My Friend!"
It took a bit of painting, measuring, cutting, and gluing but we did it!
And well, I'm just tickled pink at how great this turned out!
I hope you are too!

Here are some tips for achieving the best finish.
You can learn from my mistakes...
Use newspaper or butcher paper to make a pattern of the surface you're wanting to cover. Once you know that your pattern fits then cut your wallpaper (paying close attention to the pattern of the wallpaper so you get the best pattern centered on the piece)
Don't rely only on Mod Podge or only on the wallpaper glue to adhere your paper to the surface. You should wet the wallpaper just like you're going to hang it on the wall and adhere it in combination with the Mod Podge. It will take both to stick permanently.
After you've positioned your paper in the right place use an old credit card to smooth out any air/glue bubbles. Start in the center and work out. This will ensure that your paper lays smooth and gives a more professional look.
Once you get your wallpaper attached to the piece, and it has dried, take a fine toothed rasp, nail file, or piece of sandpaper and file/sand the outer edges where the paper meets the wood. This will give you a uniform 'painted' rather than a 'papered' look. You can go back in later with paint to cover up any rough areas.
When you are satisfied with the look spray or paint a clear sealer for protection.
In case you're wondering, for this table I used 2 different types of wallpaper and 1 piece of matte-finished gift wrap.

And that's all there was to it!
If you try this (or any other new projects you'd like to share)
then post a picture here so we can see how great they turned out!
Oh. And Note to friends...
...If you stop by to visit be prepared you may be put to work {grin}.
Hugs!


2 comments:
Hey Cheryl....I'm so happy you have been so busy. The table looks great. Much better than the way it started. And, the yummy pops look as good as those kids. They are soooo cute. I e-mailed you a couple of weeks ago. I was worried you were in those storms or the fires. I guess the e-mail got lost. (sign of relief).
Hi! Thanks for checking out the buttons. I hope that you post yours on your blog when you get them done! I'd love to see them! That little table is cool! I can just imagine it in a room with a black crystal chandelier!
Post a Comment